
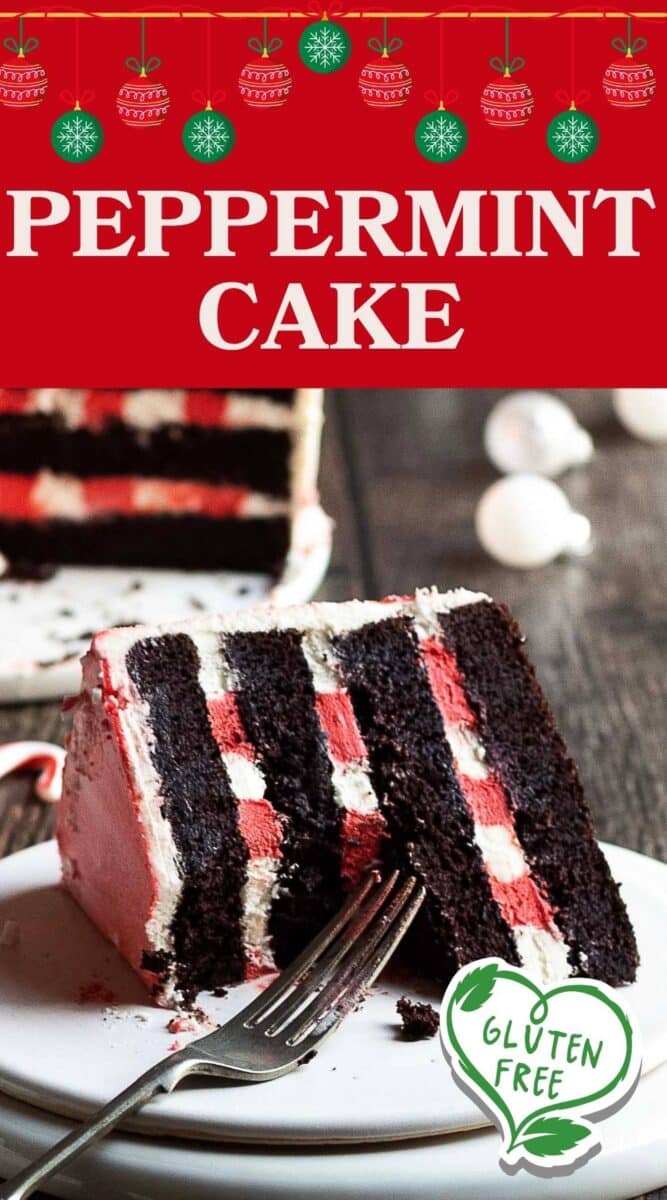

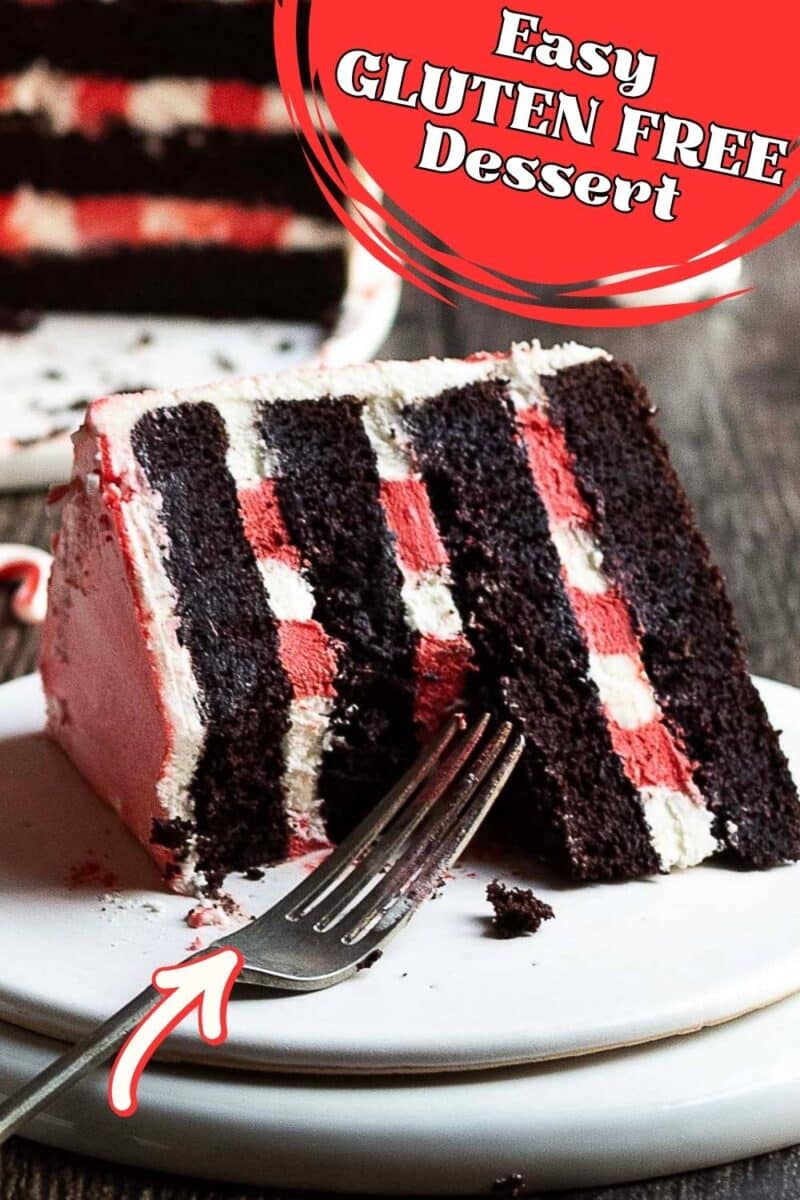

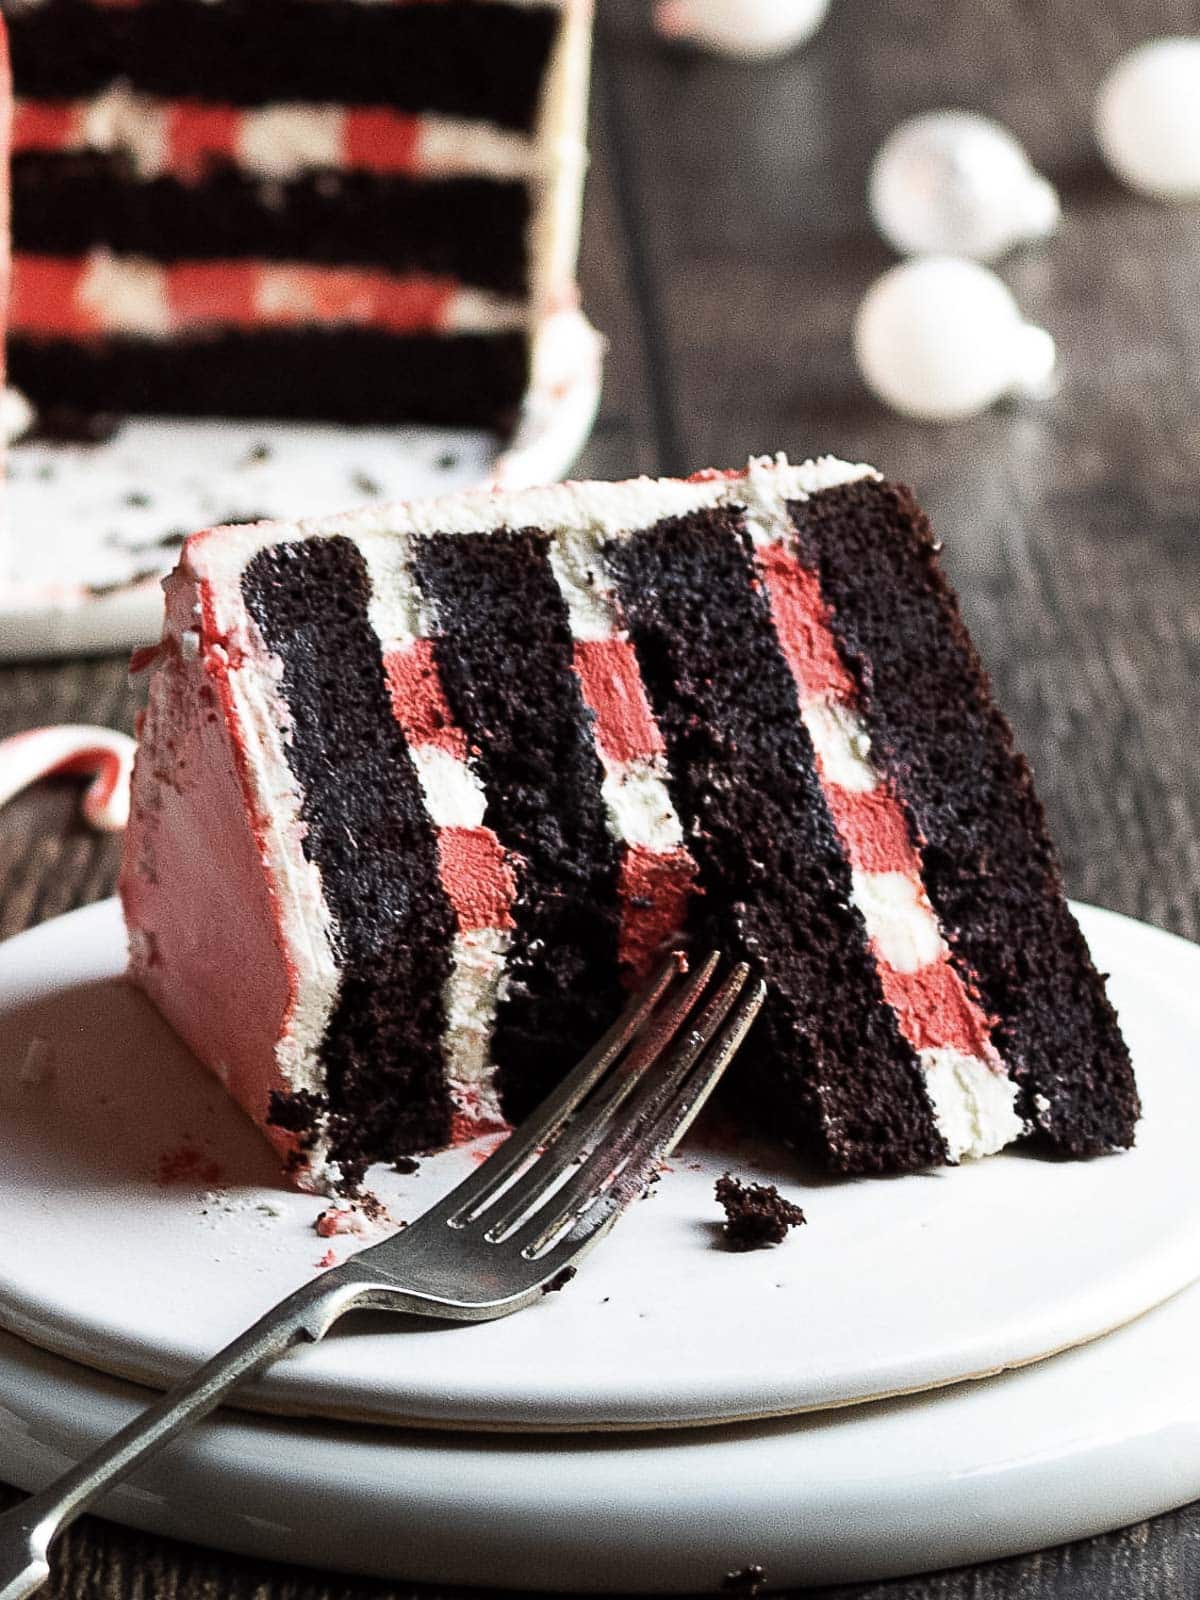
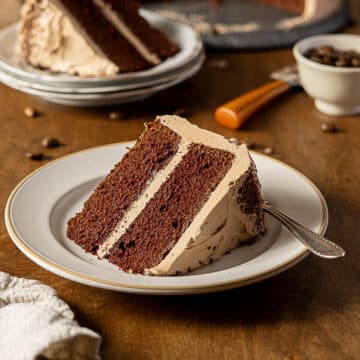
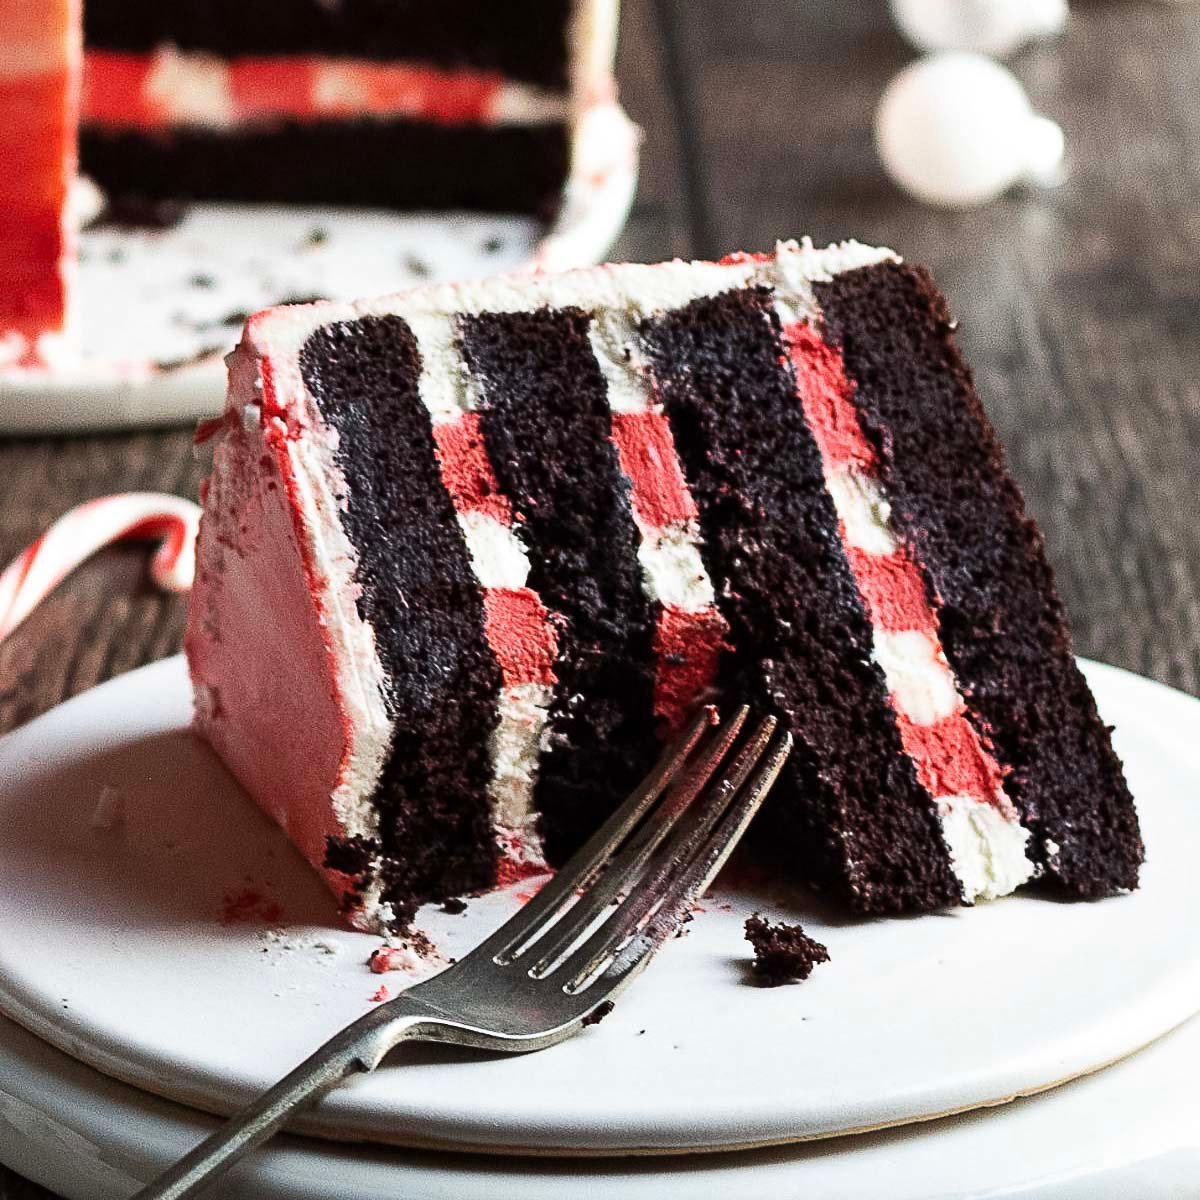
This gluten free peppermint chocolate cake is a rich, festive dessert made for the holidays. Deep dark chocolate layers meet a tangy peppermint cream cheese frosting in a show-stopping candy cane design that is completely doable at home.
Save This Recipe!
Skill Level: Intermediate-Advanced
Shortcut Central: You can doctor up a gluten free chocolate cake mix and frosting by adding peppermint extract.
Flavor Remix: Swap peppermint extract for orange extract and make this cake all winter long!
Allergy Watch: Gluten Free, Nut-Free
This cake feels like Christmas on a plate. The bold cocoa flavor is balanced by a whisper of cool peppermint, like a peppermint patty. Refreshing without overpowering the chocolate.
I love this cake recipe for its reliable structure and moist crumb. The key is tempering the melted chocolate into the batter before folding it in, which keeps the cake tender and smooth. And if you've ever battled dry or crumbly gluten free cake layers, you'll appreciate how this version stays soft even after a night in the fridge.
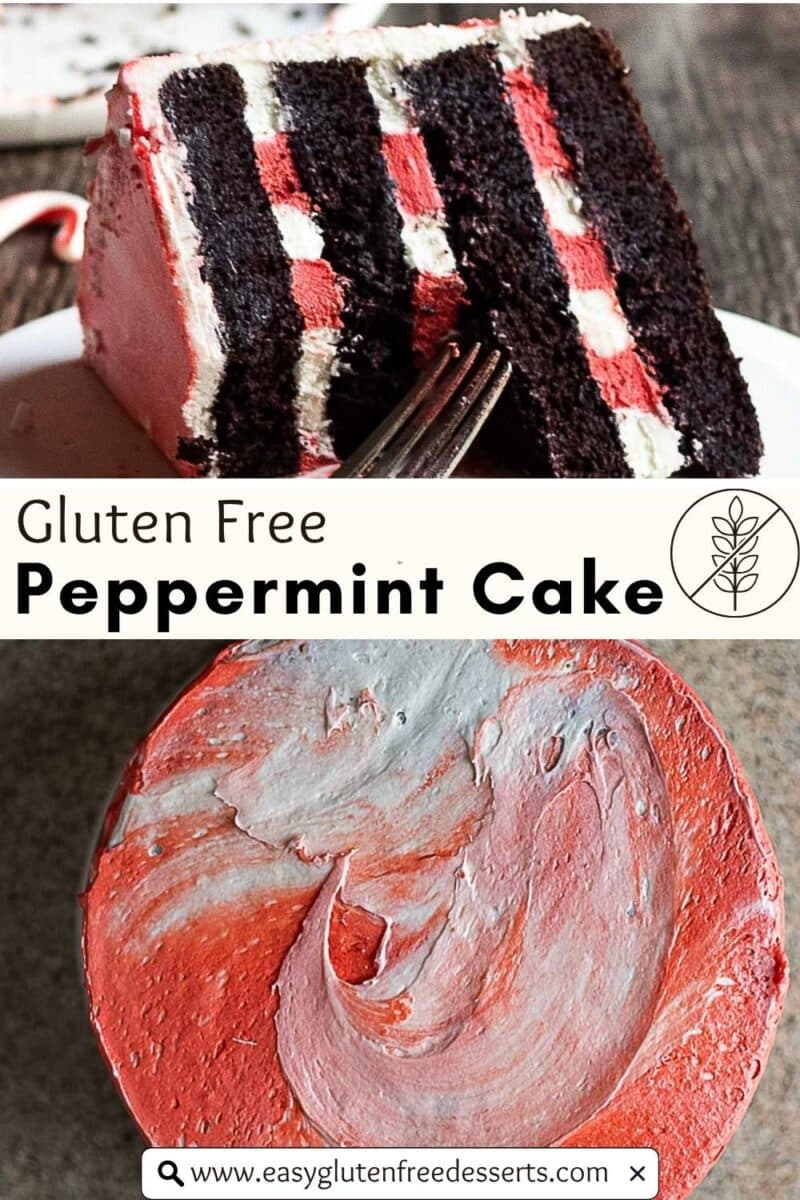
The real fun comes when you slice it. Those red and white frosting rings inside reveal a candy-cane surprise that makes every slice sparkle at a holiday table. I you aren't a cream cheese person, you can make a traditional gluten free buttercream instead.
Ingredient Notes
- Gluten-Free Flour: Use any 1:1 gluten free flour blend with xanthan gum, like Bob's Red Mill 1:1 Flour or King Arthur Measure for Measure.
- Butter: Use unsalted butter or reduce the salt added by ¼ teaspoon.
- Vinegar: You can't taste the vinegar, but it is required to activate the baking soda. Plus side, it enhances the chocolate flavor.
- Cocoa Powder: Try Dutch-processed cocoa powder. The better the quality of the chocolate, the better the flavor.
- Eggs: Use room temperature eggs for the best texture.
- Leveners: This recipe uses both baking powder and baking soda, no substitutes.
- Cream Cheese: Make sure it's room temperature so your frosting whips up silky-smooth, not lumpy.
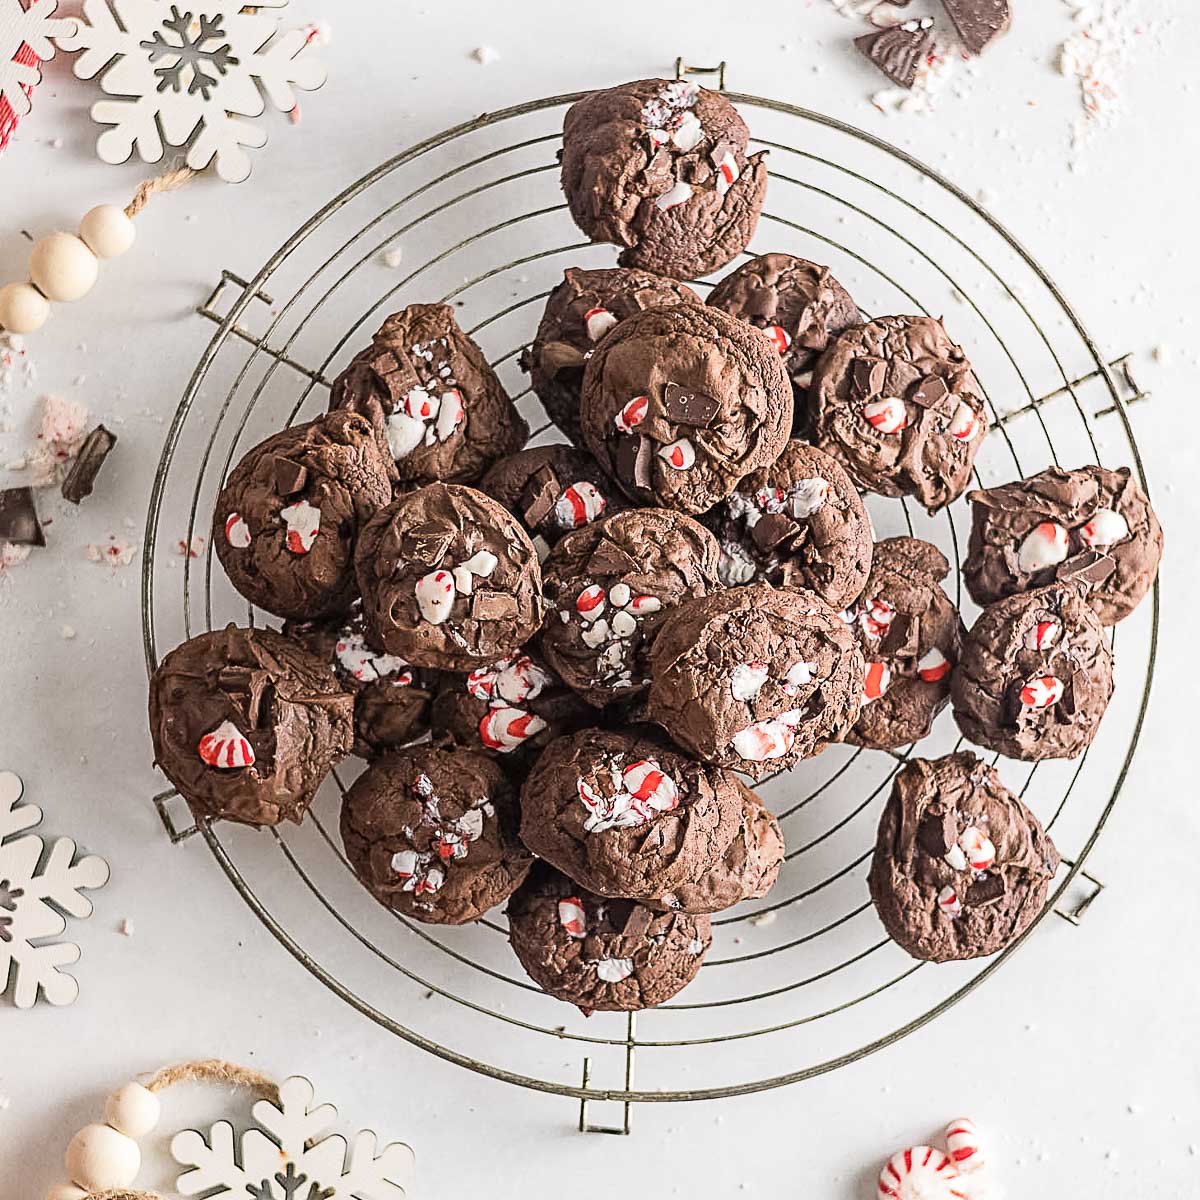
Peppermint Cookies
If you want these flavors all holiday season long, try these GF peppermint chocolate cookies.
How to Make Gluten Free Chocolate Peppermint Cake
A step-by-step visual guide for making gluten-free peppermint cake. You can skip to the recipe for the full written instructions.

Prep the Pans
The first step to a layer cake is properly buttering, flouring, and lining the cake pans with parchment. No shortcuts here!

Mix the Dry Ingredients
Step 2 text
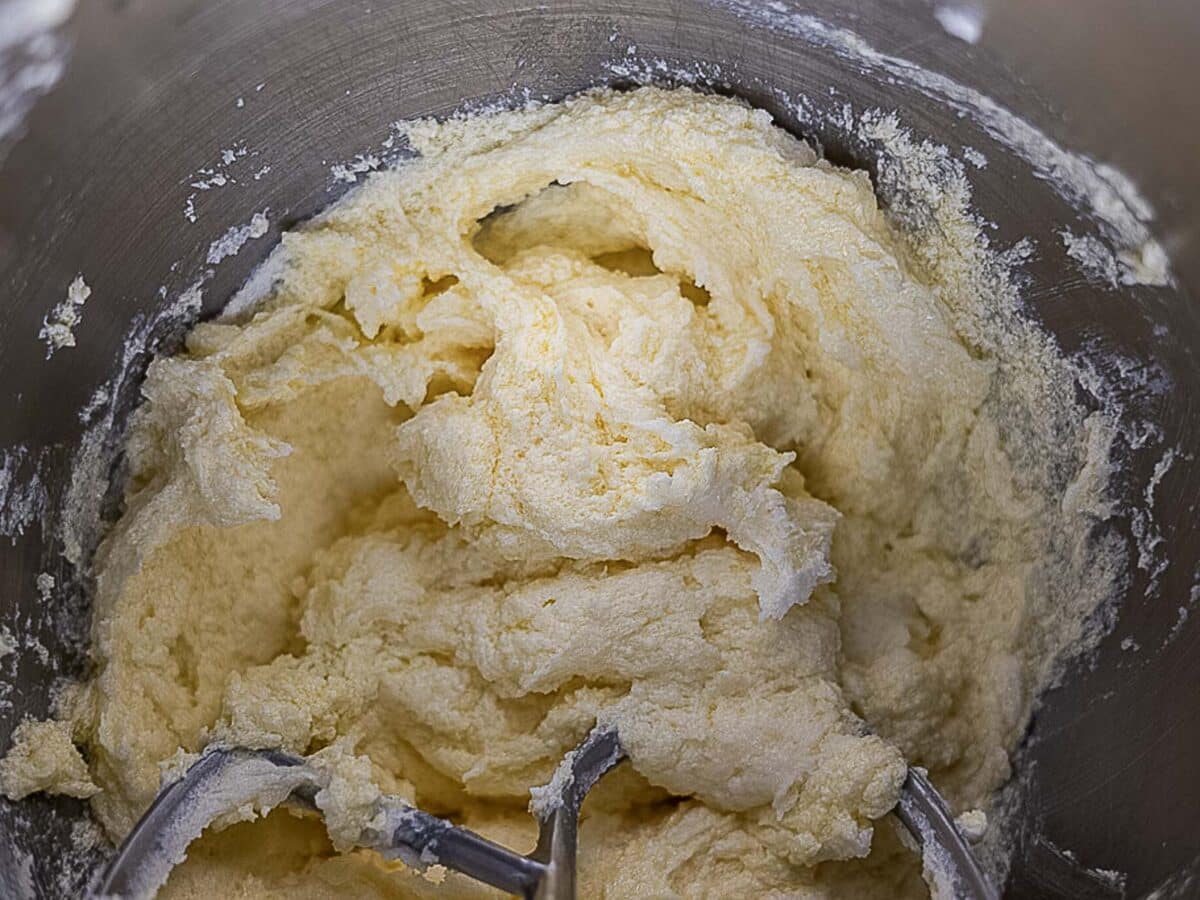
Cream the Butter and Sugar
This traps air and gives structure to the gluten free crumb. Beat until pale and fluffy before adding eggs one at a time.
Add the Dry Ingredients
Alternate the dry and wet ingredients. Mixing gradually prevents overworking the batter. Too much mixing means dense, gummy layers.
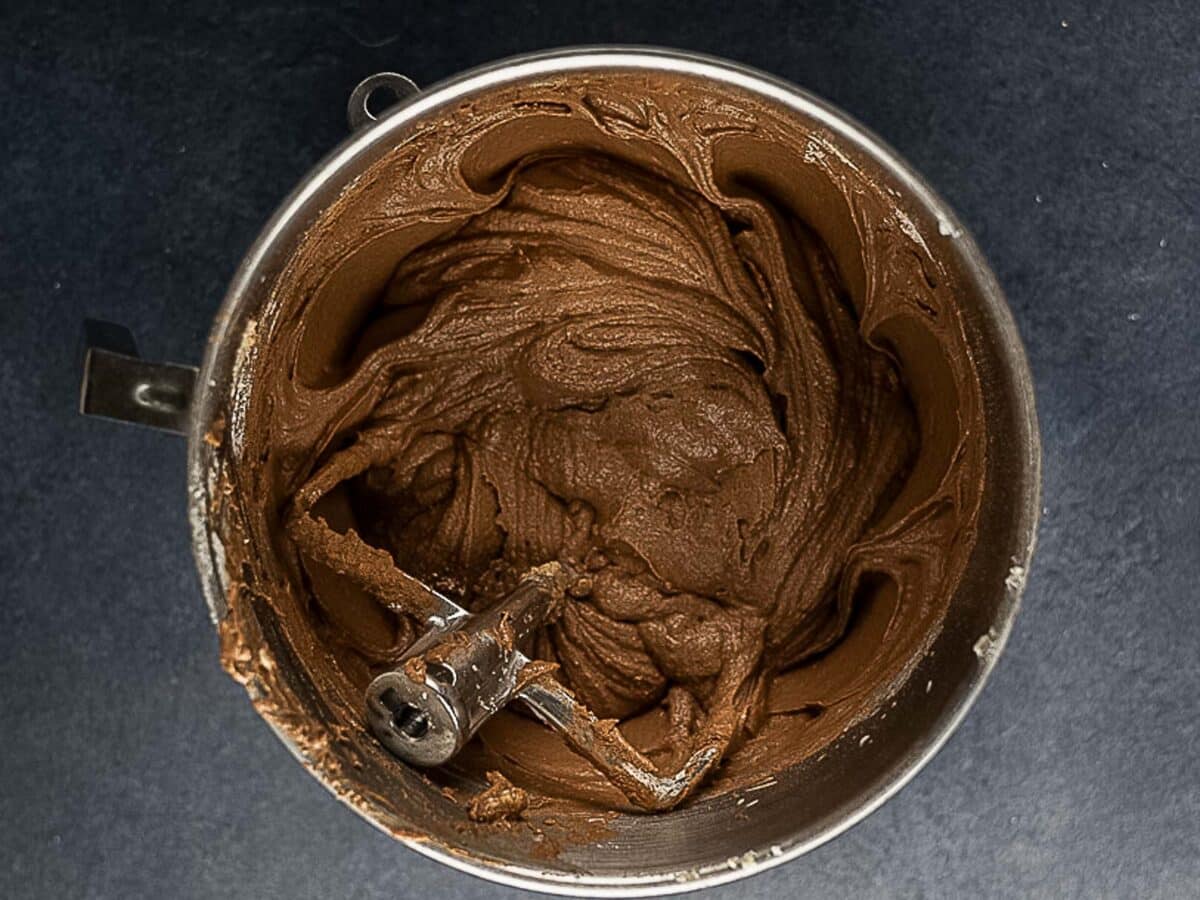
Mix in the Chocolate
Whisk a spoonful of batter into the melted chocolate, then fold it all back in. This simple technique keeps your cake silky instead of streaky.

Bake
Let the layers rest on the counter for at least 10 minutes before turning out. Gluten free cakes are delicate when warm.

Make the Peppermint Frosting
Beat softened cream cheese until smooth, then add the butter. Once fluffy, whip in powdered sugar and peppermint extract until light and smooth.
How to Assemble and Frost

Assemble and Frost
Use a bread knife to cut each cooled cake layer horizontally to create 4 layers. You can make a swirl pattern (see photo)in between the layers if desired.
Decorate
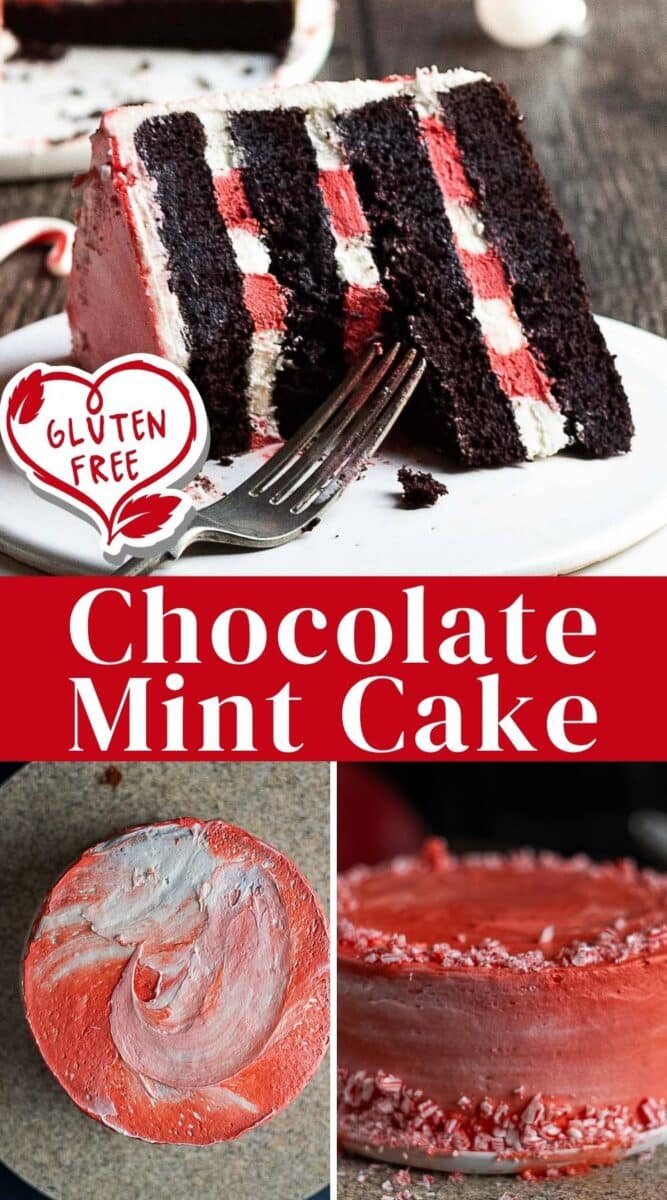
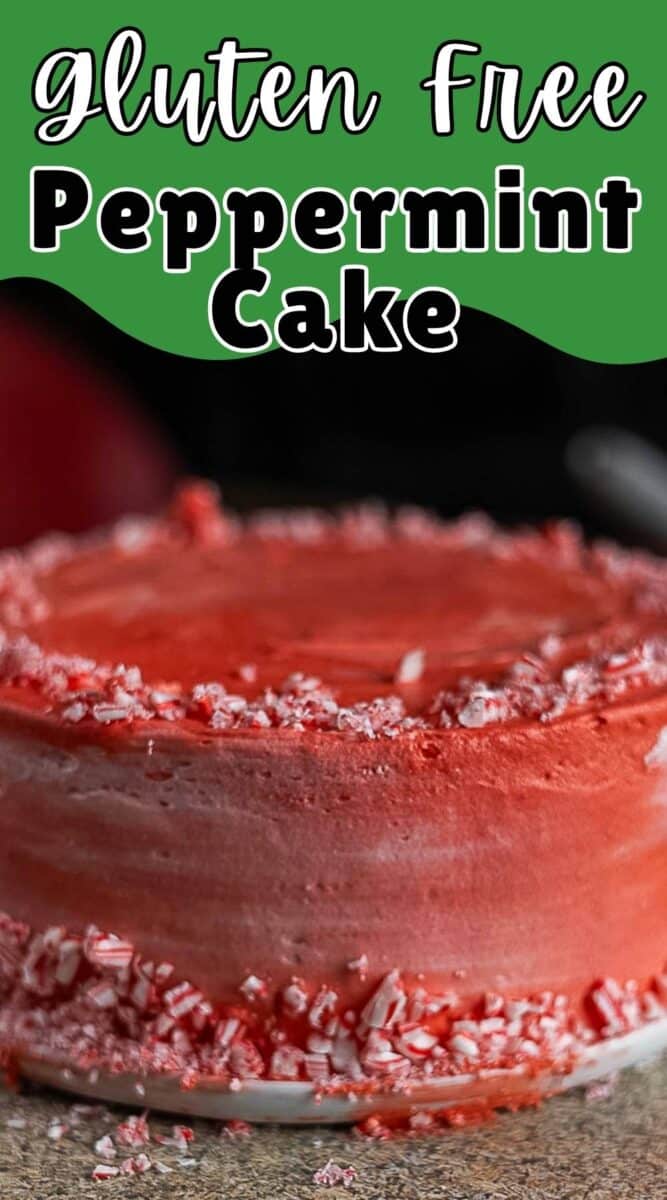
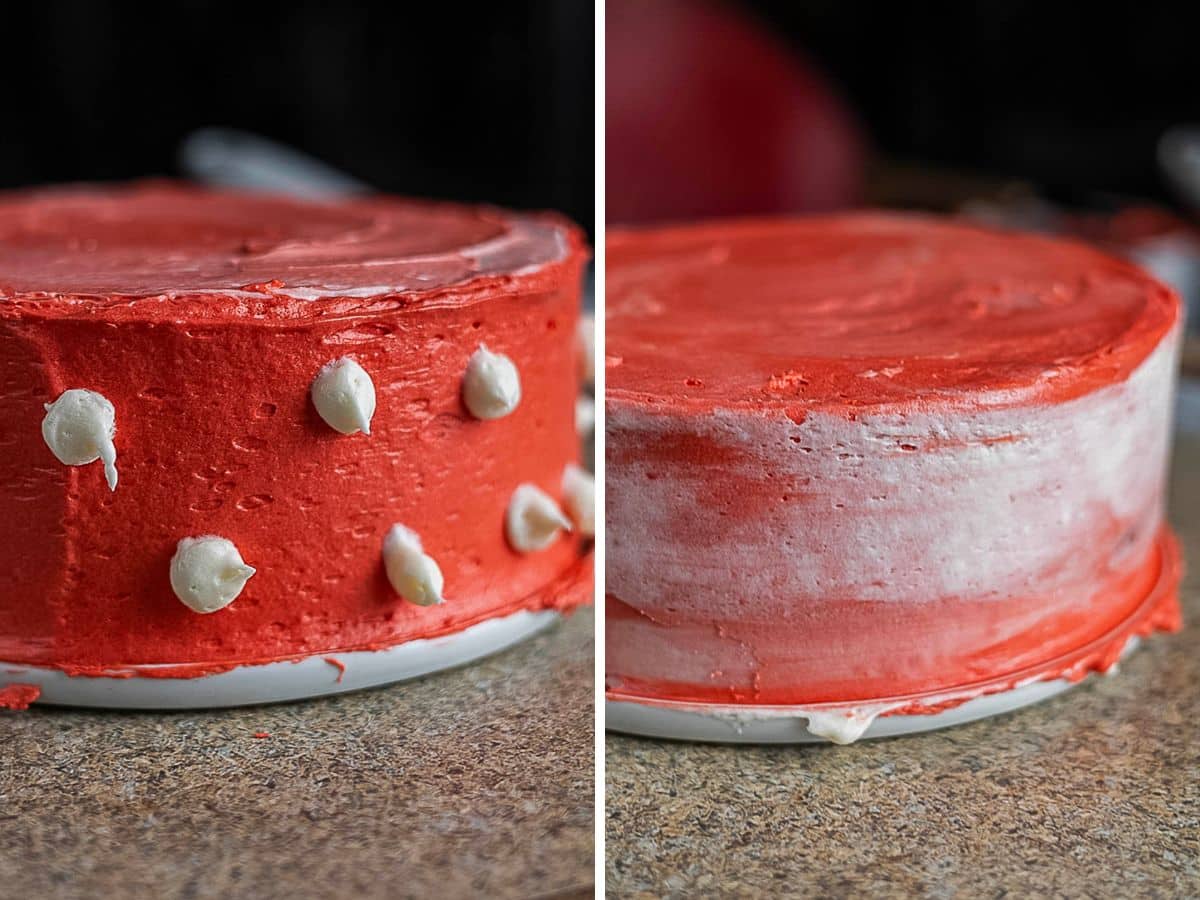
Finish with a tie-dye swirl on the outside and a sprinkle of crushed candy canes for sparkle.
Jen's Recipe Notes
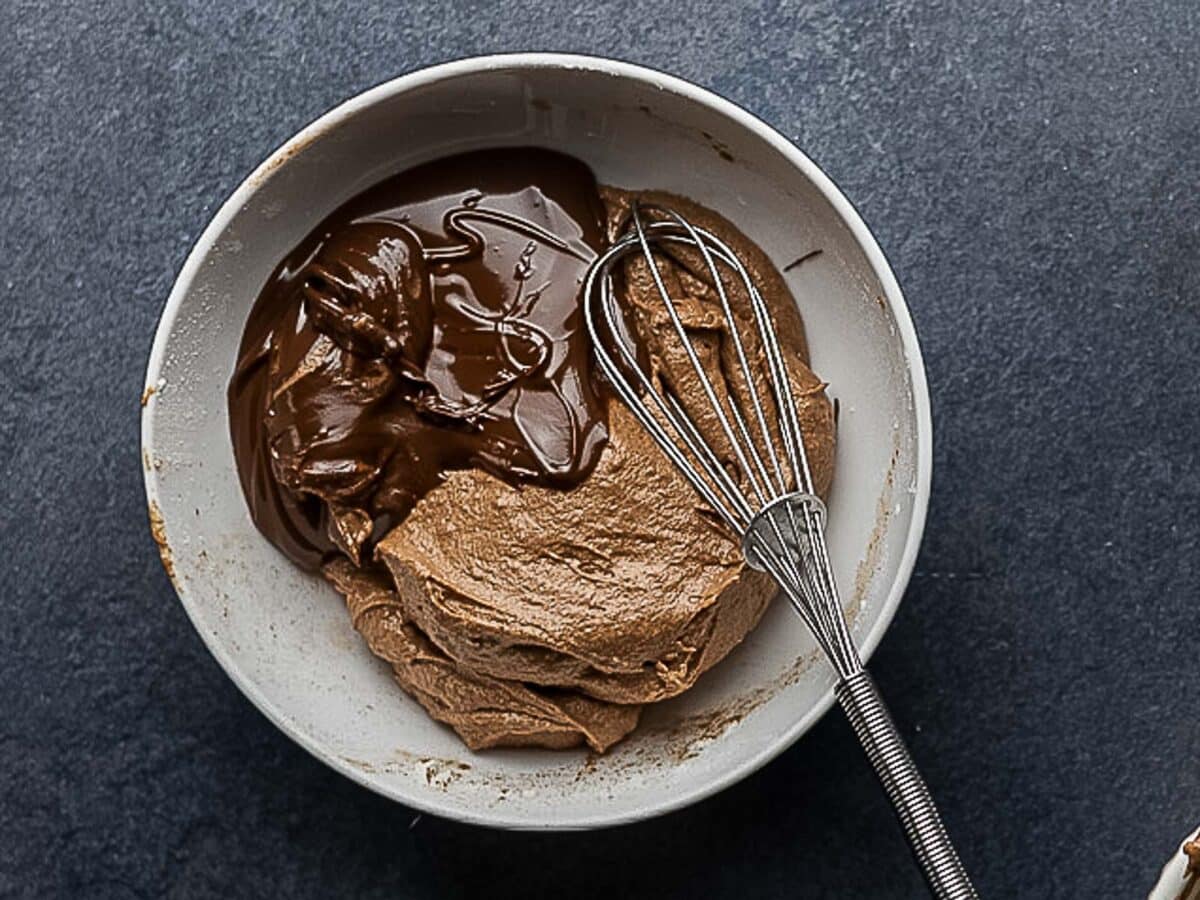
- Don't skip tempering the chocolate with the cake batter.
- Weigh the cake pans to ensure you get the batter evenly distributed.
- Always rest gluten-free cake batter before baking. Just 10 minutes rehydrates the flour and proteins, building a better structure.
- Use cake collars for an even bake and less dome to the top.
- Do not trim the cakes until they are totally cool.
- Chill the cake until the center frosting layers are firm before you frost the outside of the cake.
- Gel food coloring will be brighter without thinning out your frosting.
More Christmas Cake Recipes

Make Ahead and Storing
Make Ahead: Cake layers can be baked, wrapped tightly, and frozen for up to 2 months. Frosting can be made a week ahead and re-whipped before using.
Storing: Refrigerate the frosted cake for up to 4 days.
Freezing: Freeze unfrosted cake layers wrapped in plastic and foil for up to 2 months. Thaw at room temperature before assembling.
📖 Recipe
Gluten Free Chocolate Peppermint Layer Cake
Save This Recipe!
Ingredients
- 2 ¼ cups granulated sugar
- 1 ¼ cups unsalted butter room temperature
- 2 eggs
- 3 cups 1:1 gluten-free flour with xanthan gum
- ⅔ cup dark cocoa powder
- 1 ½ teaspoons baking soda
- 1 teaspoon baking powder
- ½ teaspoon kosher salt
- 2 cups whole milk
- 1 tablespoon white vinegar
- 2 teaspoons peppermint extract
- 1 teaspoon vanilla extract
- ½ cup dark chocolate chips melted
- 2 candy canes crushed
Peppermint Cream Cheese Frosting
- 2 cups cream cheese room temperature
- 1 ½ cups unsalted butter room temperature
- 8 cups powdered sugar
- 1 teaspoon peppermint extract
- ½ teaspoon kosher salt
Instructions
- Preheat the oven to 350°F. Brush two 8-inch baking pans with unsalted butter and dust them with gluten-free all-purpose flour. Place a circle of parchment paper at the bottom of each pan and set aside.
- Whisk together the gluten-free all-purpose flour, dark cocoa powder, baking soda, baking powder, and salt in a medium bowl. Set aside.3 cups 1:1 gluten-free flour with xanthan gum, ⅔ cup dark cocoa powder, 1 ½ teaspoons baking soda, 1 teaspoon baking powder, ½ teaspoon kosher salt
- Mix the milk, white vinegar, peppermint extract, and vanilla extract in a measuring cup. Set aside.2 cups whole milk, 1 tablespoon white vinegar, 2 teaspoons peppermint extract, 1 teaspoon vanilla extract
- Place the granulated sugar and butter in a mixing bowl. Using a stand mixer with the paddle attachment or a hand mixer, beat on high speed until light and fluffy, about 2 minutes. Turn off the mixer and scrape down the sides of the bowl. Add the eggs one at a time, scraping down the bowl after each addition.2 ¼ cups granulated sugar, 1 ¼ cups unsalted butter, 2 eggs
- Add one-third of the dry ingredients to the mixing bowl and mix on low speed just until combined. Turn off the mixer and scrape down the sides of the bowl. Add half of the milk mixture and mix on low speed just until combined. Turn off the mixer and scrape down the sides of the bowl. Add another one-third of the dry ingredients and mix until combined. Turn off the mixer and scrape down the sides of the bowl. Add the remaining milk mixture and mix on low speed just until combined. Turn off the mixer and scrape down the sides of the bowl. Finish by adding the remaining dry ingredients and mix until just combined.
- Using a spatula, fold in the melted chocolate. Divide the batter evenly between the two cake pans. Let rest for 10 minutes. Place the pans in the oven and bake for 35-40 minutes, or until the cake bounces back when gently pressed in the center or a toothpick inserted in the center comes out clean.½ cup dark chocolate chips
- Remove from the oven and place on a cooling rack for 10-15 minutes. Turn the cakes out onto the cooling rack and let cool completely.
Peppermint Cream Cheese Frosting
- Place the cream cheese in a large mixing bowl. If using a stand mixer, use the whisk attachment. Beat on medium speed until the cream cheese is smooth and beginning to become fluffy. Add the butter and mix until well combined.2 cups cream cheese, 1 ½ cups unsalted butter
- Add the powdered sugar, peppermint extract, and salt to the bowl. Mix on low speed until the sugar is incorporated. Turn off the mixer and scrape down the sides of the bowl. Turn the mixer to high speed and whip until light and fluffy. Turn off the mixer, scrape down the bowl again, then whisk on high speed for 1-2 minutes until the mixture is smooth and well incorporated.8 cups powdered sugar, 1 teaspoon peppermint extract, ½ teaspoon kosher salt
Suggested Cake Decoration
- Place about half of the frosting in a medium bowl. Whisk in ½ teaspoon of red food coloring or 4-5 drops of red gel food coloring until you reach the desired shade of red.
- To ice the cake, place the red frosting in a piping bag or large zip-top bag. Place the white frosting in another piping bag or large zip-top bag. Cut the end of each bag (or corner of the zip-top bags) to create a ½-inch opening.
- To frost the cake, cut each cake in half crosswise to create four layers. Place the bottom layer on a cake stand or plate, and set it on a turntable if available. Starting with the white frosting, pipe a circle around the outer edge of the bottom layer. Next to the white frosting circle, pipe a circle of red frosting. Continue alternating white and red frosting circles until the entire layer is covered. Repeat with the remaining three layers, then place the final cake layer on top.
- Chill the cake until the center frosting layers are firm, about 15 minutes. Frost the outside of the cake with white frosting to create a crumb coat, then repeat the frosting layers until no cake is visible. Refrigerate the cake between frosting layers for about 15 minutes each time.
- Pipe small dots of red frosting onto the outside of the cake and gently spread to create a tie-dye effect. Sprinkle crushed candy canes around the top edge and the base of the cake. Refrigerate until ready to serve.2 candy canes
Equipment
- electric mixer or stand mixer
Notes
- About 30 minutes before serving, remove the cake from the refrigerator.
- Do not skip the step of tempering melted chocolate into the cake batter. This is essential to creating a smooth and fluffy cake batter.
- You can trim the top and make this a two layer cake instead of 4.
Nutrition
Recipe Questions
Yes, you can absolutely make these as cupcakes or use a different pan size. For cupcakes, fill liners about ⅔ full and bake at the same temperature, checking for doneness around 18-22 minutes. If using a different pan (like a 9x13 or bundt), adjust the baking time accordingly-start checking 5-10 minutes before the listed time for thinner layers or add time for deeper pans. Be sure to grease and line your pans well for easy release.

Courtney Starr says
I didn't do the fancy design and left the cake frosting white but added crushed candy canes.